

Do you remember those rich, fudgy brownies from your school cafeteria—the ones with the thick, glossy chocolate frosting on top? Those are Lunch Lady Brownies, and they’re just as delicious as you remember! These classic treats are known for their moist, chewy texture and perfectly sweet frosting that melts in your mouth. The best part? You don’t have to wait for a school lunch to enjoy them anymore. In this post, I’ll show you how to make authentic Lunch Lady Brownies at home with simple ingredients and easy steps. Whether you’re craving a nostalgic dessert or introducing this classic to a new generation, this recipe is sure to become a family favorite!
What Are Lunch Lady Brownies?
Related Baking Techniques:
Link to reputable sources that explain baking techniques, like how to achieve the perfect fudgy texture in brownies.
Example: King Arthur Baking: Tips for Perfect Brownies
Ingredient Information:
Link to articles about key ingredients, such as cocoa powder or vanilla extract, to help readers understand their roles in baking.
Example: The Kitchen: Types of Cocoa Powder and How to Use Them
Lunch Lady Brownies are a nostalgic dessert that many people associate with their school days, specifically the cafeteria lunches served by the beloved lunch ladies. These brownies are distinguished by their unique texture and rich, chocolatey flavor, making them a favorite treat for kids and adults alike.
Originating in the United States, Lunch Lady Brownies are often characterized by their dense and fudgy consistency, which results from a combination of essential ingredients such as butter, sugar, cocoa powder, flour, and eggs. Unlike traditional brownies that might be more cake-like, Lunch Lady Brownies have a chewy, gooey profile that sets them apart, providing a mouthwatering experience with every bite.
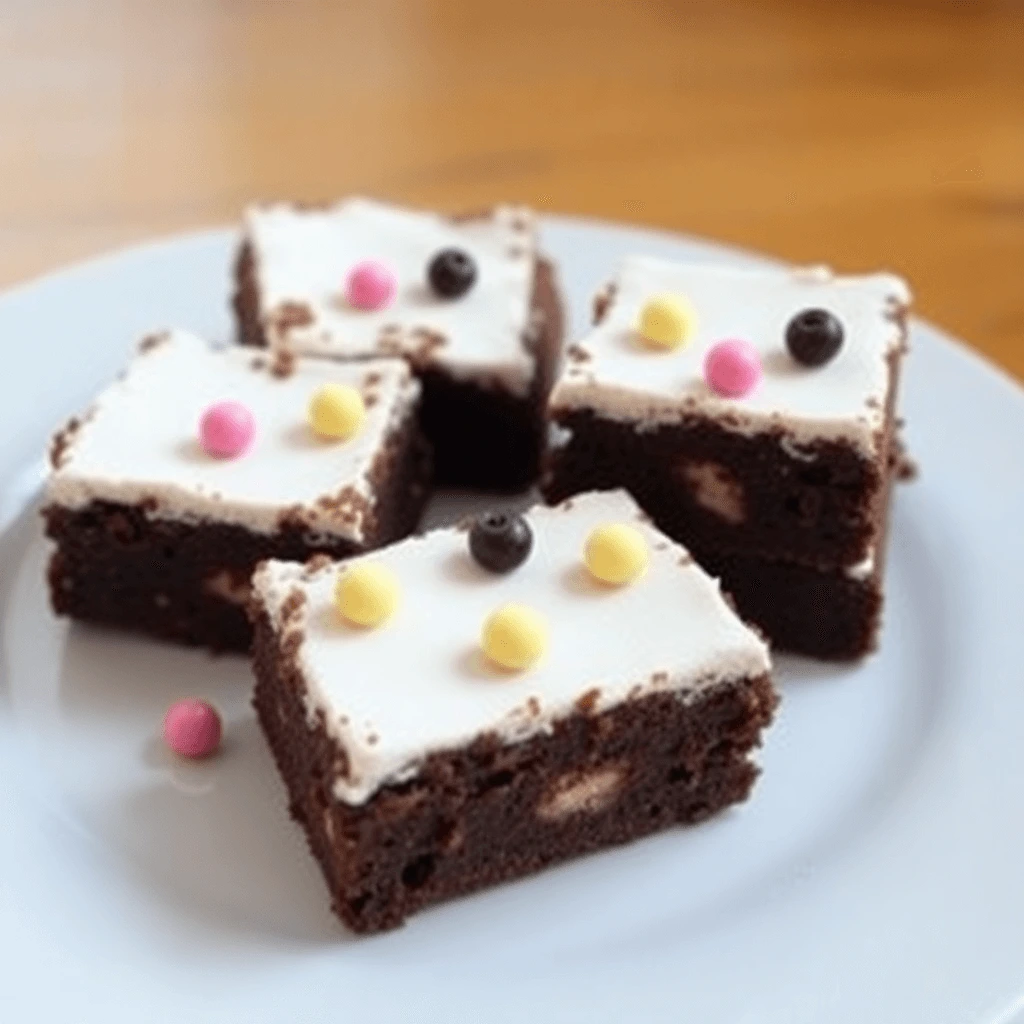
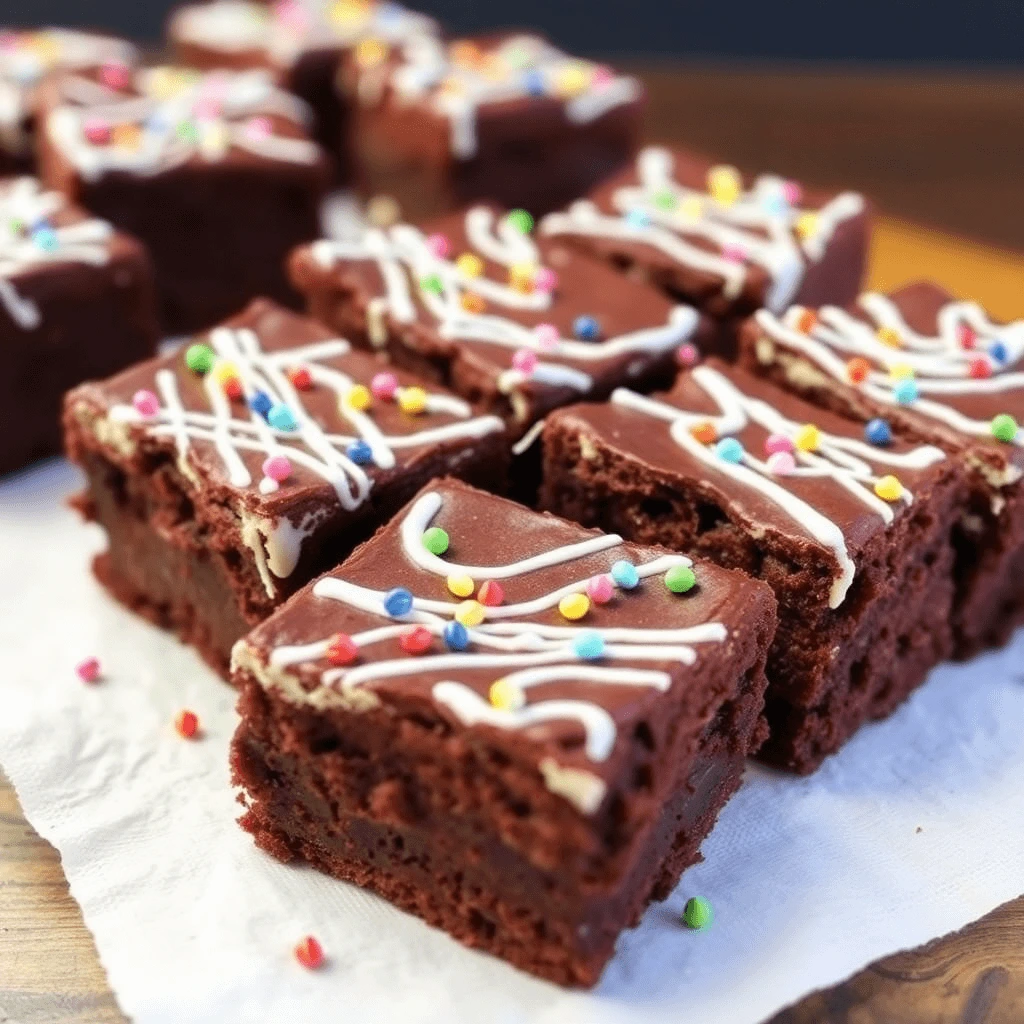
Typically, these brownies are topped with a simple yet satisfying chocolate frosting, which adds an extra layer of sweetness and enhances their overall appeal. The frosting can often be adorned with colorful sprinkles, nuts, or even a dusting of powdered sugar for that delightful finishing touch, making them as visually appealing as they are delicious.
These brownies are often made in large batches, making them an ideal choice for school fundraisers, bake sales, or family gatherings. Their straightforward preparation and the use of common pantry ingredients mean they can be whipped up quickly, making them a go-to dessert for both novice and experienced bakers.
The charm of Lunch Lady Brownies lies not only in their taste but also in the memories they evoke—camaraderie with friends during lunch breaks, the excitement of school events, and the comfort of home-baked treats. For many, these brownies are a wonderful way to relive those sweet moments from childhood and share them with the next generation. Whether enjoyed warm from the oven or at room temperature, Lunch Lady Brownies are a timeless dessert that continues to bring joy and deliciousness to all who indulge.
Ingredients You’ll Need for Authentic Lunch Lady Brownies
To create the perfect batch of Lunch Lady Brownies, you’ll need a handful of simple yet essential ingredients. This recipe utilizes basic pantry staples that come together to deliver the rich and fudgy flavor that makes these brownies a nostalgic favorite. Here’s a detailed look at each ingredient:
- All-Purpose Flour:
- Purpose: The foundation of the brownie batter, all-purpose flour provides structure and stability. It helps bind the ingredients together while adding a slight chewiness to the final product.
- Tip: To ensure accurate measurement, spoon the flour into your measuring cup and level it off with a knife—this prevents overpacking, which can lead to dense brownies.
- Unsweetened Cocoa Powder:
- Purpose: This is the star ingredient that gives Lunch Lady Brownies their chocolaty flavor. Cocoa powder enhances the richness and adds depth to the overall taste profile.
- Tip: Choose high-quality unsweetened cocoa powder for the best flavor. Dutch-processed cocoa can provide a smoother, milder taste, while natural cocoa adds a bit of acidity and intensity.
- Granulated Sugar:
- Purpose: Sugar sweetens the brownies and contributes to their gooey texture. It plays a crucial role in achieving the right balance of flavors and improves the overall moistness.
- Tip: Avoid using too much sugar; while these brownies are meant to be sweet, too much can mask the chocolate flavor.
- Brown Sugar:
- Purpose: Adding brown sugar imparts a slight caramel flavor and additional moisture, making the brownies extra fudgy. The molasses in brown sugar also adds a touch of complexity to the flavor.
- Tip: Using a mix of granulated and brown sugar enhances the depth of sweetness and ensures a tender texture.
- Butter:
- Purpose: Butter is essential for adding richness and flavor to the brownies. It contributes to the fudgy texture and helps achieve that sought-after melt-in-your-mouth quality.
- Tip: Use unsalted butter to control the saltiness in the recipe. Make sure it’s melted for easy incorporation into the batter.
- Large Eggs:
- Purpose: Eggs act as a binding agent, helping to hold the brownies together while providing moisture and richness. They also help with leavening, giving the brownies their slight rise.
- Tip: Room temperature eggs mix more easily into the batter, resulting in a smoother texture.
- Vanilla Extract:
- Purpose: Vanilla enhances the overall flavor of the brownies, providing a warm and inviting aroma. It balances out the sweetness and adds depth to the chocolate taste.
- Tip: For the best flavor, use pure vanilla extract rather than imitation vanilla.
- Salt:
- Purpose: Salt is a flavor enhancer that brings out the sweetness and chocolate flavors in the brownies. It balances the ingredients, preventing the dessert from tasting overly sweet.
- Tip: A small pinch can make a real difference, but avoid overdoing it; too much salt can overpower the chocolate.
Optional Toppings:
- Chocolate Frosting: A classic addition, chocolate frosting enhances the sweetness and provides a creamy finish on top of the fudgy brownies.
- Sprinkles: Add a fun, colorful touch to the frosting, making the brownies visually appealing and even more enticing.
- Nuts: Chopped walnuts or pecans can be folded into the batter or sprinkled on top for additional texture and flavor.
With these ingredients, you can create authentic Lunch Lady Brownies that capture the essence of those childhood memories while satisfying your chocolate cravings. The beauty of this recipe lies in its simplicity and the delightful results it yields—perfect for sharing, satisfying a sweet tooth, or reliving those nostalgic school days!
Step-by-Step Guide: How to Make Lunch Lady Brownies at Home
Making Lunch Lady Brownies at home is not only a fun culinary project but also a way to recreate a delicious treat that many people fondly remember from their school days. Below is a detailed step-by-step guide to help you achieve that perfect batch of fudgy brownies—complete with helpful tips along the way!
Step 1: Preheat the Oven
- What to Do: Begin by preheating your oven to 350°F (175°C).
- Tip: Preheating is crucial as it ensures the brownies bake evenly and achieve that desired fudgy texture.
Step 2: Prepare Your Baking Pan
- What to Do: Grease a 9×13-inch baking pan with butter or line it with parchment paper for easy removal.
- Tip: If using parchment, leave some overhang on the sides. This makes it easier to lift the brownies out after baking for cleaner cuts.
Step 3: Mix the Dry Ingredients
- Ingredients: In a medium bowl, combine 1 cup of all-purpose flour, 1/2 cup of unsweetened cocoa powder, and a pinch of salt.
- What to Do: Whisk these ingredients together to ensure they are well-combined and free of lumps.
- Tip: Mixing the dry ingredients first helps even distribution when added to the wet ingredients and prevents clumping.
Step 4: Cream the Wet Ingredients
- Ingredients: In a separate large bowl, add 1/2 cup of melted unsalted butter, 1 cup of granulated sugar, and 1 cup of packed brown sugar.
- What to Do: Mix these together until combined, then add 4 large eggs and 2 teaspoons of vanilla extract.
- Tip: Use an electric mixer for a smooth consistency. Mix until the batter is light and creamy, which will help incorporate air for a better rise.
Step 5: Combine Wet and Dry Ingredients
- What to Do: Gradually add the dry mixture to the wet mixture, stirring gently with a spatula or wooden spoon until just combined.
- Tip: Be careful not to overmix; it’s okay if there are a few small streaks of flour. Overmixing can lead to tougher brownies.
Step 6: Pour and Spread the Batter
- What to Do: Pour the brownie batter into the prepared baking pan. Use a spatula to spread it evenly across the pan.
- Tip: If desired, you can fold in nuts (like chopped walnuts or pecans) or chocolate chips at this stage for added flavor and texture.
Step 7: Bake the Brownies
- What to Do: Place the pan in the preheated oven and bake for 25-30 minutes. The brownies are done when a toothpick inserted into the center comes out with a few moist crumbs.
- Tip: Keep an eye on them as ovens can vary. If the toothpick comes out clean, the brownies may be overbaked, so aim for that slightly underbaked texture for the best fudginess.
Step 8: Cool the Brownies
- What to Do: Once baked, remove the brownies from the oven and allow them to cool in the pan on a wire rack for at least 15-20 minutes.
- Tip: For enhanced flavor, let them cool completely before cutting; this allows the texture to firm up a bit.
Step 9: Frosting (Optional)
- Ingredients: For the frosting, combine 1/4 cup of melted butter, 1/4 cup of cocoa powder, 1 1/2 cups of powdered sugar, and 2-3 tablespoons of milk.
- What to Do: Mix until smooth, adding more milk if necessary for spreading consistency. Once the brownies are cooled, spread the frosting evenly on top.
- Tip: For added visual appeal, sprinkle colorful sprinkles or crushed nuts on the frosting before it sets.
Step 10: Cut and Serve
- What to Do: Using a sharp knife, cut the brownies into squares or rectangles, depending on your preference.
- Tip: For cleaner cuts, wipe the knife with a paper towel between cuts. Serve them warm or at room temperature, and enjoy!
Final Tips:
- Storage: Store leftover brownies in an airtight container at room temperature for up to a week, or refrigerate for longer freshness.
- Customization: Feel free to experiment by adding ingredients like peanut butter swirls, caramel, or different types of chocolate!
With these steps, you’ll be well on your way to making delicious Lunch Lady Brownies that are sure to delight family and friends, bringing back that cherished taste of nostalgia!
Tips & Tricks for the Best Fudgy Brownies
Creating fudgy brownies that are rich, moist, and chewy involves attention to detail and a few tried-and-true techniques. Here are some essential tips and tricks to ensure your brownies turn out perfectly every time:
1. Use High-Quality Ingredients
- Chocolate: Choose a high-quality cocoa powder and, if your recipe calls for chocolate, opt for bars or chips made from quality chocolate. The flavor of your brownies will greatly depend on the quality of the chocolate used.
- Butter: Use real unsalted butter for a rich flavor. Margarine or substitutes can alter the texture and taste of your brownies.
2. Measure Ingredients Accurately
- Importance of Precision: Baking is a science, so measuring your ingredients accurately is vital. Use a kitchen scale for precision, especially with ingredients like flour and cocoa powder.
- Leveling Off: For dry ingredients, use the spoon and level method—spoon the ingredient into the measuring cup and use a straight edge (like a knife) to level it off.
3. Don’t Overmix the Batter
- Gentle Incorporation: Overmixing can lead to tough brownies. Mix just until the dry ingredients are incorporated. A few lumps are okay!
- Folding Technique: When combining wet and dry ingredients, use a folding motion instead of stirring aggressively. This technique helps keep the air in the batter and enhances the texture.
4. Experiment with Brown Sugar and Granulated Sugar Ratios
- Sweetness and Texture: A combination of brown sugar and granulated sugar can create an ideal balance of sweetness and moisture. Brown sugar adds a caramel flavor and chewiness, while granulated sugar contributes to a crispier top.
5. Adjust Baking Time and Temperature
- Know Your Oven: Every oven is different. Keep a close eye on your brownies as they bake, starting to check them a few minutes before the recommended time.
- Perfect Toothpick Test: Insert a toothpick into the center of the brownies. If it comes out with moist crumbs (not wet batter), the brownies are done. If it comes out clean, they might be overbaked.
6. Chill the Batter
- Enhanced Fudginess: For even fudgier brownies, consider chilling the batter in the refrigerator for 30-60 minutes before baking. This step allows the fats to solidify before baking, resulting in a denser texture.
7. Use Parchment Paper
- Easy Removal: Line your baking pan with parchment paper, allowing for easy removal of the brownies. You can lift them out of the pan using the edges of the parchment, leading to cleaner cuts.
- Prevent Sticking: Even if you grease the pan, parchment paper can provide an additional layer of insurance against sticking.
8. Allow for Cooling Time
- Importance of Patience: Allow the brownies to cool completely before cutting. This helps them firm up and makes it easier to achieve clean slices.
- Taste Development: Cooling also allows the flavors to meld together, enhancing the overall taste.
9. Experiment with Mix-Ins
- Add Texture and Flavor: Consider adding chocolate chips, nuts, or even peanut butter swirls to your brownie batter. This not only enhances flavor but also creates interesting textures.
- Adjust Cooking Time: Keep in mind that adding mix-ins can slightly alter the baking time, so monitor the brownies closely.
10. Store Properly
- Keeping Fresh: If you have leftovers (though they may not last long!), store them in an airtight container at room temperature for up to a week. For longer storage, place them in the refrigerator or freezer.
- Reheating Tips: To revive the fudginess, reheat a square in the microwave for a few seconds, giving it that freshly baked warm texture.
11. Consider Toppings
- Frosting and Ganache: If you want an extra layer of flavor, consider adding a glossy chocolate ganache or a simple buttercream frosting on top of your brownies.
- Sprinkles or Nuts: After frosting, add sprinkles, chopped nuts, or flaked sea salt for visual appeal and a satisfying crunch.
By implementing these tips and tricks, you can elevate your brownie-making game and create the ultimate fudgy brownies that will wow everyone who tries them. Happy baking!
How to Store and Serve Your Lunch Lady Brownies
Proper storage and serving techniques can significantly enhance the enjoyment of your Lunch Lady Brownies, keeping them fresh and delicious for longer. Here’s a comprehensive guide:
1. Storing Brownies
- Room Temperature:
- Ideal Storage Conditions: If you plan to eat your brownies within a week, store them at room temperature. Place them in an airtight container to keep them moist. Avoid exposing them to air, as this can lead to drying out.
- Paper Towel Trick: For added moisture retention, place a piece of wax paper or parchment paper underneath the lid of the container, absorbing excess moisture and preventing sogginess.
- Refrigerator:
- For Longer Shelf Life: If you don’t plan to eat the brownies within a week, refrigerate them. Wrap the brownies tightly in plastic wrap or place them in an airtight container. Although refrigeration may slightly change the texture (making them less fudgy), it extends their freshness.
- Reheating Tip: When ready to enjoy, you can quickly microwave them for about 10-15 seconds to return their fudgy texture.
- Freezer:
- Long-Term Storage: Brownies can be frozen for up to three months. To freeze, wrap each piece individually in plastic wrap and then place them in a resealable freezer bag or airtight container.
- Thawing Instructions: When you’re ready to enjoy your frozen brownies, simply remove them from the freezer and thaw at room temperature for about 30 minutes, or microwave them in short intervals until warm.
2. Serving Brownies
- Presentation Matters:
- Cutting Into Squares: Use a sharp knife to cut the brownies into squares for serving. For cleaner cuts, wipe the knife with a damp cloth between slices. This helps maintain the square shape and keeps the edges neat.
- Serving Temperature: Brownies can be served at room temperature or slightly warmed, depending on personal preference. Warm brownies can be especially delicious when paired with ice cream.
- Toppings and Additions:
- Adding Flavor: Consider serving your brownies with a dollop of whipped cream or a scoop of vanilla ice cream on the side for a delightful contrast. For drizzling, chocolate or caramel sauce can elevate the flavor and presentation.
- Fresh Fruits: Pairing brownies with fresh berries, like raspberries or strawberries, adds a refreshing, tart element that balances the richness of the brownie.
- Garnishes:
- Finishing Touches: Dusting with powdered sugar or cocoa powder can add a beautiful touch to the appearance of your brownies. Or, consider sprinkling some flaked sea salt on top to heighten the chocolate flavor.
3. Creating a Brownie Bar
- Fun Serving Option: For gatherings or parties, consider setting up a “brownie bar.”
- Setup Ideas: Provide various toppings and mix-ins for guests to customize their brownies. Options could include nuts, chocolate chips, crushed cookies, caramel sauce, whipped cream, and fresh fruits.
- Interactive Experience: This creates an interactive dessert experience and caters to diverse tastes.
4. Pairing Suggestions
- Beverage Pairings:
- Milk: Classic dairy or plant-based milk is always a hit with brownies.
- Coffee or Tea: For adults, a cup of coffee or tea can complement the rich chocolate flavor wonderfully.
- Dessert Wine: A sweet dessert wine can also pair perfectly with brownies, especially those topped with ice cream or heavy frosting.
By understanding how to properly store and serve your Lunch Lady Brownies, you can ensure that each treat remains fresh and enjoyable, whether you’re indulging solo or sharing with friends and family. Enjoy your baking and the delicious results!